Posts

Showing posts from April, 2021

NuiMOs Bathroom Vanity

Image
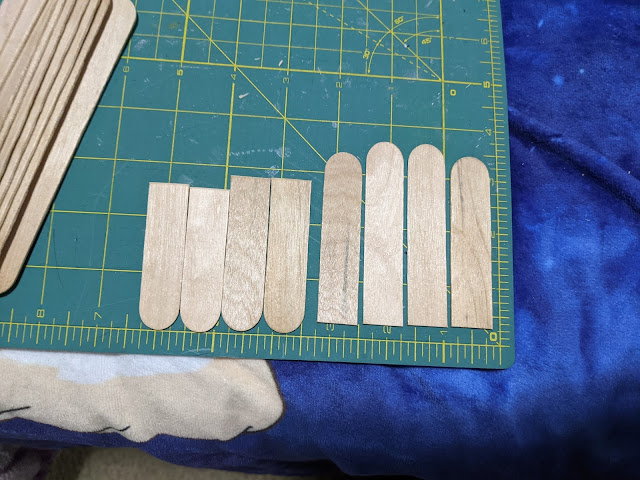
The final piece of furniture I have for today is a bathroom vanity! I actually have a couple pieces of furniture that I haven't taken pictures of yet, but most were super simple so it'll be easy to write a post about them someday. But for now this the final one for today. =) Here's what you'll need: Cardboard (average thickness and thin) Hot Glue and Hot Glue Gun Craft Foam (two colors) Popsicle Sticks Pipe Cleaners Craft Paper Cutters Tin Snips Ruler Pen Aluminum Foil or Mirror Cut out some cardboard: 3" x 5" (x2), 3" x 2.5" (x2), and 2.5" x 5" (x2). Glue them as pictured above, and cut a hole for your sink. Make a sink out of craft foam and glue it to the inside of the sink hole. What I don't show in the next photo is cutting a piece a cardboard that goes underneath the popsicle stick exterior. The doorway is 4" x 3", so that should make the piece 5" x 3.5" originally. I get this because the pieces that goes around

NuiMOs Kitchen Sink and Stove Combo

Image
Continuing on with the kitchen, I decided to make a sink and stove combo to save space. It was around this point that I realized my house didn't have much of that, and I thought it would be easier to make once piece versus two pieces. Here's what you'll need: Carboard (average thickness and thin) Hot Glue and Hot Glue Gun Craft Foam (two colors)  Popsicle Sticks Clear Plastic Craft Paper Silver Pipe Cleaners Cutters Tin Snips Ruler Pen First cut out: 3" x 8" (x2), 2.5" x 3.25" x(3), and 2.5" x 8" (x2). Glue them as shown above. The smaller side is the stove. Now this part is a bit hard to describe since there aren't a lot of pictures and I made it a while ago. I remember these pieces are all 0.5" wide. The opening for the doorway is 4" x 3". Oh, so there we are. The piece above the stove is 0.5" x 3". The piece making the doorway should be 5" x 3.5". Also I added a piece of cardboard towards the bottom of

NuiMOs Refrigerator

Image
The next piece of furniture is actually an appliance: the refrigerator! This is another piece that I started with a box that I had. I thought that I was the perfect size for a nuiMO to use. It was a lot better than having to cut out all the individual pieces for the body/structure of the fridge. And I was lucky enough that this one opened up sideways. Here's what you'll need: A Box Thinner Cardboard Hot Glue and Hot Glue Gun Craft Foam Bamboo Skewers In the first two photos I show how I decided to design the doors. I wanted my freezer to be on the bottom so I cut the door accordingly. I then added a piece of cardboard to separate the two main compartments I then added a box to the freezer door that was just the right size to be snug but not to the point where it was difficult to slide out. I then focused on the main compartment. I made two little shelves out of thin cardboard for the inside, but I had to make sure that the didn't go all the way to the front. I needed to mak

NuiMOs Bed

Image
The next item of furniture was a bed! I ended up making four of these and now I wondering if I should've made a bunk-bed instead to save space. I might still covert these into bunk-beds but for now they are individual. Here's what you'll need: Foam Core Board and/or Cardboard Hot Glue and Hot Glue Gun Cutters Craft Foam Popsicle Sticks  Tin Snips To start off you'll need to cut out: 4" x 8", 4.25" x 3.25", 4.25" x 2.75", and 1" x 8" (x2). Mark the pieces that are 4.25" wide at the 1" height all the way across as pictured above. That 1" line is where you will take the largest piece and glue it with the top of the piece lining up with the line. You'll then take the long skinny pieces and glue them to the sides. This is the bed structure. The next part is to just make it look appealing. I used craft foam to cover the sides of the bed and then long the top of the headboard and footboard. I also made a piece to cover

Simple Kitchen Table

Image
This was probably the simplest thing I created for my nuiMOs house. And that's because I used some pre-made items to help me out.  Here's what you'll need: Gift Card Box Lid Another Small Box Bamboo Skewers Popsicle Sticks Craft Foam   This is where the simplicity comes in. I used the gift card box lid for the top of the table. I then glued a small box to the underside and then glued the bamboo skewers into holes on the bottom. And that gives the basic shape I need.  To finish it off I used craft foam to cover the top of the table and then used popsicle sticks to cover the bottom. Tada! That's it. Something simple but attractive looking. I hope this can give you some ideas to use some little things you might have around the house to make something for your nuiMOs. Please share what you create here or with @disneynuimosdiy on Instagram. Have fun crafting!

Popsicle Lawn Chairs

Image
Now, I think this may be the only pieces of furniture where I got pictures of the whole process. What is this madness? Hahaha. These are actually fairly simple! The toughest part for me was figuring out how to cut the popsicle sticks. I asked a family member and they gave me a pair of tin snips! Those made everything so easy. Here's what you'll need: Popsicle sticks Hot Glue Tin Snips These first three pictures show how I made the back and the bottom on the chairs. I cut 8 pieces in total. The 4 for the back of the chair are longer than the 4 for the bottom. I then glued two pieces of popsicle sticks to the back of each pieces to give it support. I then took the back and glued it on an angle to the bottom as shown. For the legs/support for armrests, I started with two popsicle sticks. I formed then into an X to get the shape I needed. I marked the popsicle sticks and cut them where I marked. That gave me the exact angle I needed to glue the pieces together properly. I then glue

Couch and Chairs

Image
Here's the beginning of the furniture I made for my nuiMOs house. I'm loosely calling these tutorials because I didn't take pictures during every single step. I should've but I thought some pictures were boring. So, I started with the living room furniture.  Here's what you'll need: Foam Core Board Cutters Ruler Hot Glue Fabric Bits of Foam Bamboo Sticks Optional: Batting   In the two pictures above I cut out several pieces: 3.25" x 8" (x4) and 3.25" x 2.25" (x4). I took two of each matching pieces and glued them together to get to four pieces. (You go from 8 to 4 in total.)  In these above photos I glued the four pieces I created to make the couch shape. When I did that I didn't like how thin the bottom was. I took the couch and added one big piece to the bottom This is where the photos began to be sparse. I wasn't exactly sure where I should stop to take a picture at each point anyway. I would recommend if you want your couch to loo