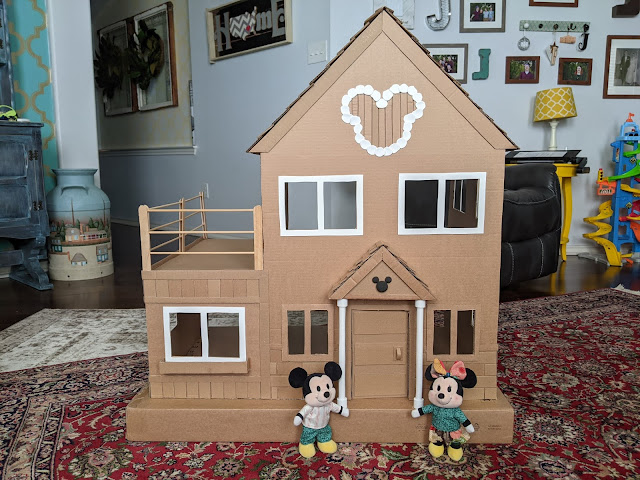
Cardboard nuiMOs House (Day One)
Recently I've been thinking about making some cute furniture to make for my Mickey and Minnie nuiMOs, but I wasn't sure where I could put them. I was fiddling around with the idea of the perfect scale that could work for them, but it seems that it's all over the place. Others on FB groups have tried to find things that could work with them with varying success. IKEA has some doll furniture and houses that seems to work pretty well. I had thought about purchasing those items and then I remembered this blog, lol. I decided to forget about scale completely and just pushed forward. Funny enough my family just went to IKEA to purchase a furniture item so there was lots of cardboard to be used! I ended up using most of the three boxes that was used to house the KOPPANG pieces and some of cardboard pieces on the inside of the boxes.
I took some progress pictures along the way. You will see my mistakes and the stuff that worked. I have plans for the future to paint the house and do floors and walls. Those will be future posts. I even drew out the patterns so that if other people wanted to give it a go they could. Just remember that everything I share is not for sale, this includes the designs and actual finished pieces. If you want to, here's what you need:
- Lots of cardboard
- Hot glue
- Measuring utensils
- Cutting utensils
- Cutting mat
- EVA (craft) foam
- Popsicle sticks
- Bamboo sticks
 |
| All the windows labeled "W" are the same size. |
 |
| Both doors are the same dimensions. |
I didn't take a picture of the finished pieces cut out. For some reason I didn't think of it, so I hope the above diagrams make up for that. Also before we continue, you see that I made this thing in my bedroom. So I'm sorry for the poor lighting.
The reason I chose the size I did is because I used one of the smaller boxes as my base. It seemed like it would be strong enough to support the whole house. I drew lines on the base so I could place the walls in a straight-ish fashion. To prop them up I used a bit of packing tape on the inside and then hot glued all along the base. I did the same thing for the smaller room.
On the walls themselves I had drawn half-way lines at 11" so I could measure where to put the second story windows and door. This was also good for putting the supports on evenly. I used the thick cardboard pieces provided to me in the IKEA boxes. If you don't have that then you can just layer cardboard a few times to the desired thickness.
I then added the upper story floors and patio roof. As I was putting them on, I could quite fit the first floor in. I had to trim it slightly before gluing. Thankfully the second floor went alright since it was open. I made sure to glue around the edges on the top and on the underside to the supports. I then added the roof pieces gluing where I could to make it sturdy.
After the roof was attached I realized I made a mistake. I had glued the patio front wall upside down. *shakes head* So I cut about an inch more of the opening on the top and then moved it down to the bottom and glued it place. To cover up the mistake on the outside I made a planter box.
The next thing I did was put together the porch pieces and glued it to the front of the house. You'll see here I had thought about using a different material for the front posts. I took them off because I thought they were ugly and it would be easier to get to the front for decorative pieces.
I added some shingles to the porch roof and some front pieces to cover up the seams. The little Mickey head is made from Crayola's Model Magic put into molds and then dried out. I hot glued the parts to get the shape.
I then cut up a bunch of different sized shingles to cover the roof. This took some time and a lot more pieces than I thought it would. I made sure that that shingles on the front of the house hung over a bit. I then glued on a long pieces on the top to give a nice clean finish to the roof. I also added two pieces on the front to cover the glue and add dimension to the front.
I took some thinner cardboard and cut strips about two inches wide and then cut pieces one inch wide to get the brick size. I then glued them to the front of the main house and the side wall. I decided to put some bricks around the door to add dimension.


This is just fabulous!!!!!
ReplyDelete