Popsicle Lawn Chairs
Now, I think this may be the only pieces of furniture where I got pictures of the whole process. What is this madness? Hahaha. These are actually fairly simple! The toughest part for me was figuring out how to cut the popsicle sticks. I asked a family member and they gave me a pair of tin snips! Those made everything so easy.
Here's what you'll need:
- Popsicle sticks
- Hot Glue
- Tin Snips
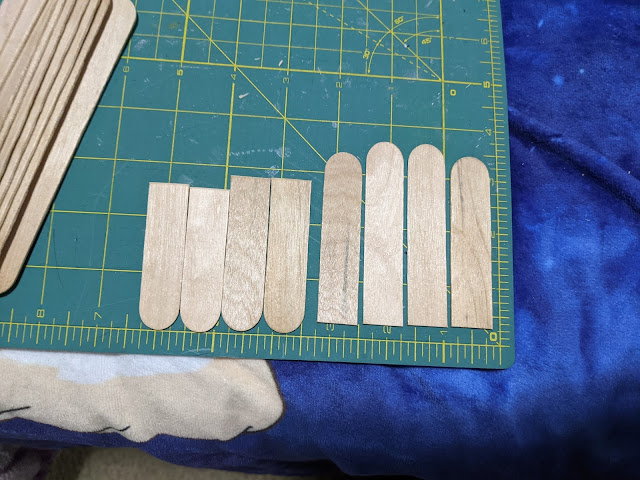
These first three pictures show how I made the back and the bottom on the chairs. I cut 8 pieces in total. The 4 for the back of the chair are longer than the 4 for the bottom. I then glued two pieces of popsicle sticks to the back of each pieces to give it support. I then took the back and glued it on an angle to the bottom as shown.
For the legs/support for armrests, I started with two popsicle sticks. I formed then into an X to get the shape I needed. I marked the popsicle sticks and cut them where I marked. That gave me the exact angle I needed to glue the pieces together properly. I then glued the legs on the bottom on the chair on the sides.
Now for the arm rest I cut small pieces of popsicle sticks. It might be hard to see but I cut a tiny notch on one of the corners of the stick and then rounded the other side. I then glued the arm rests on the top of the legs and the notched part to the back of the chair.
The lawn chairs I made go out on the upper deck I made on the home. As you can see, I used popsicle sticks to cover the floor to give it a cool deck feeling. I also made some plants using popsicle sticks, bits of craft foam, and some leaves.
I hope that these pictures and explanations are easy enough to follow. I really hope you can give these a try! Please share what you've created here or on Instagram @disneynuimosdiy. Have fun crafting!


Comments
Post a Comment